
Purpose of the article: This blog post will guide you through the process of fetching data from
Salesforce and how we can transform using the Alteryx tool and load it into Snowflake.
Tools and Technology: Alteryx tool, snowflake, salesforce
Keywords: Salesforce ODBC, Snowflake ODBC, Salesforce API, security Token
Introduction
In today’s data-driven world, seamlessly integrating data from various sources is crucial for informed decision-making. One common scenario involves migrating data from Salesforce, a leading CRM platform, to Snowflake, a powerful cloud-based data warehousing solution. This blog will explore how to accomplish this using Alteryx, a robust data analytics and integration tool.
What is Alteryx?
Alteryx is a versatile data analytics platform that simplifies data preparation, blending, analysis, and visualization from various sources. Its intuitive drag-and-drop interface accelerates data processes and delivers actionable insights without needing extensive programming knowledge.
Architecture Diagram:

Step-by-Step Guide
1. Connecting to Salesforce
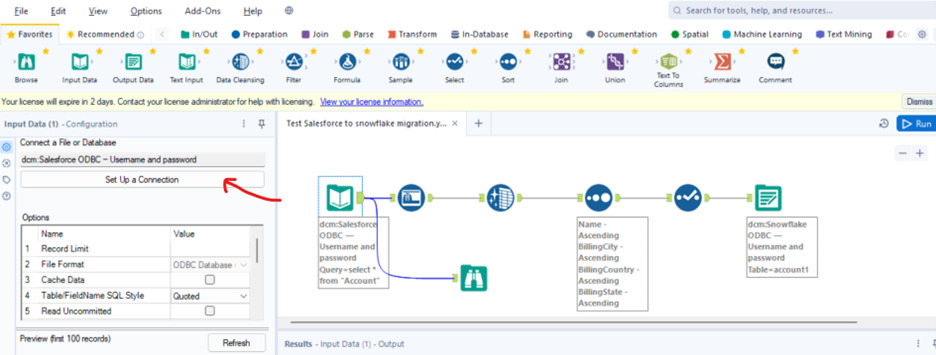
First, open Alteryx Designer and connect to Salesforce:
- Drag and drop the Salesforce Input Tool onto the canvas.
- On the left-side configuration page, click ‘Setup Connection.’
- In the next window, select the Salesforce ODBC connection.
Go to configuration >> click on the setup connection >> Next window it will show data connections select the Salesforce ODBC connection.
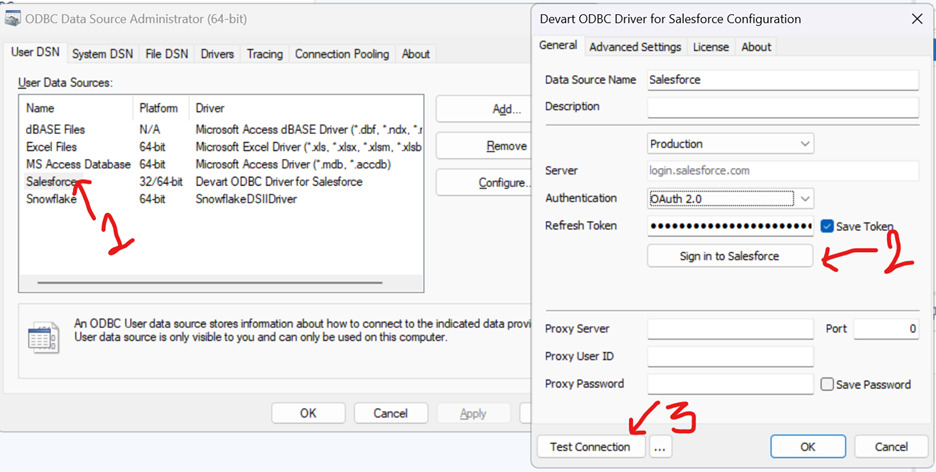
>> When you click ODBC, a new tab will open the ODBC data source administrator there we need to select Salesforce after that it will ask for your Salesforce credentials (username, password, refresh token) to connect to Salesforce, as shown in the image below. After a successful test connection click on ok.
Note: We need to generate a Refresh Token from our Salesforce account.
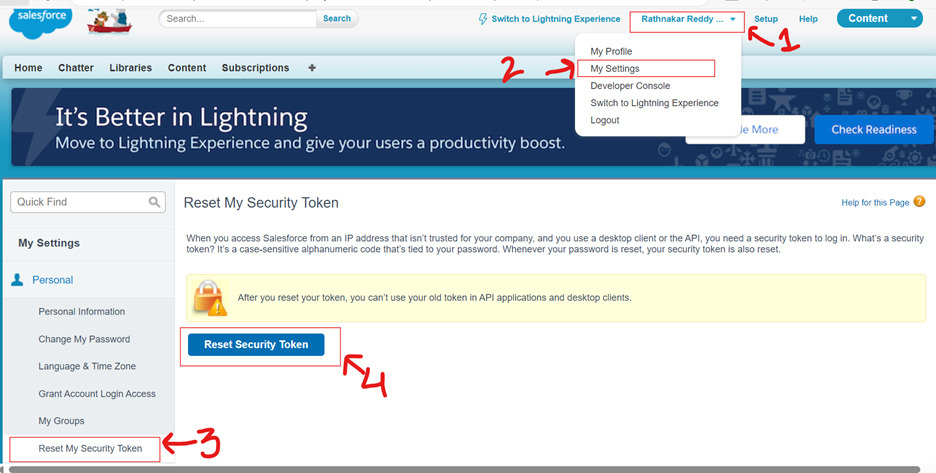
Token Generation: Go to the Salesforce developer account and select your profile name, select my settings >> then click on ‘refresh my security token’ >> then click on ‘Reset Security Token’ as shown in the below image. It will send you the token to registered mail.
- Configure Table: After ODBC’s successful connection, it will open another window to link the table.
- Select the authentication method, such as user name and password, and pass the user name and password in the given fields.
- After successful authentication click on save and link and then connect the object or table.
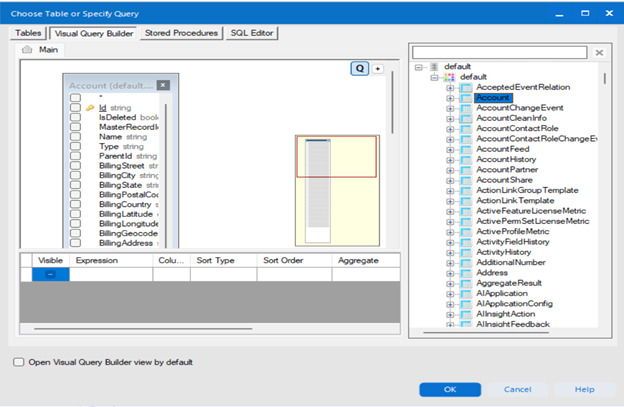
- After clicking on connect it will ask you to give the table name which we need to create a table in Target. Give the table name and click on ok.
- select the object or table from which you want to extract data. In our example, we’re extracting data from the ‘Account’ table.
In the below image, we have the input metadata structure that we have in input data.

2. Data Transformation
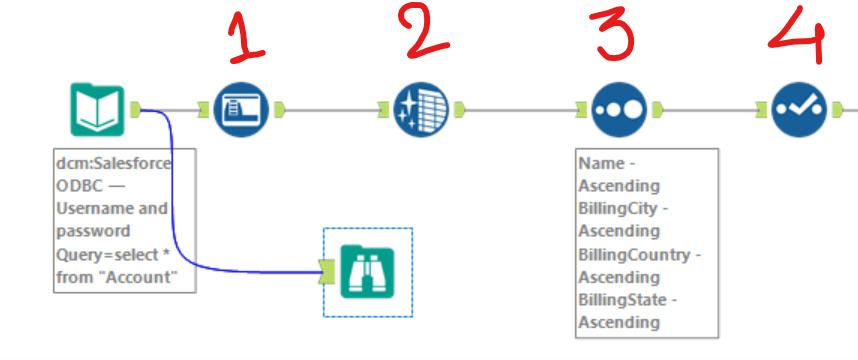
- Once the data is extracted from Salesforce, the next step is to transform it as needed. This might include cleaning, filtering, or aggregating the data. The sample workflow includes several tools for data preparation as mentioned below image:
1. Auto field tool: The Auto Field tool automatically sets the field types in your dataset based on the data’s values. This ensures that your data types are optimized for further processing.
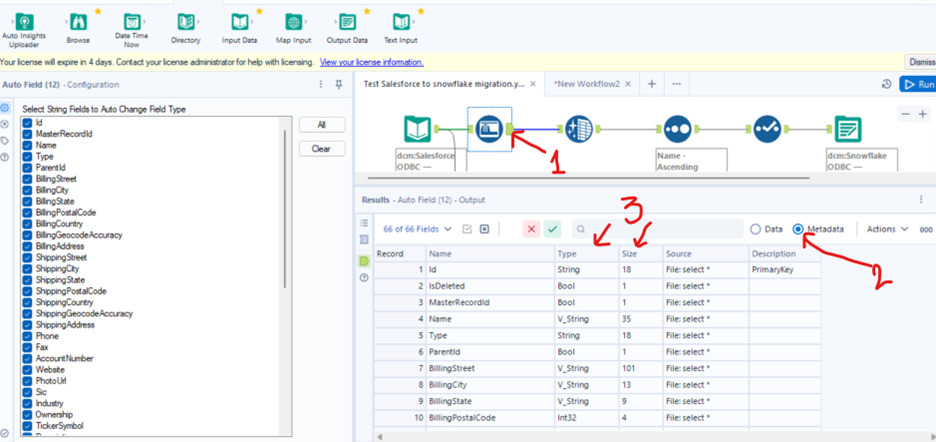
As shown in the image above, the data type and size of the columns were changed using the Auto Field tool.
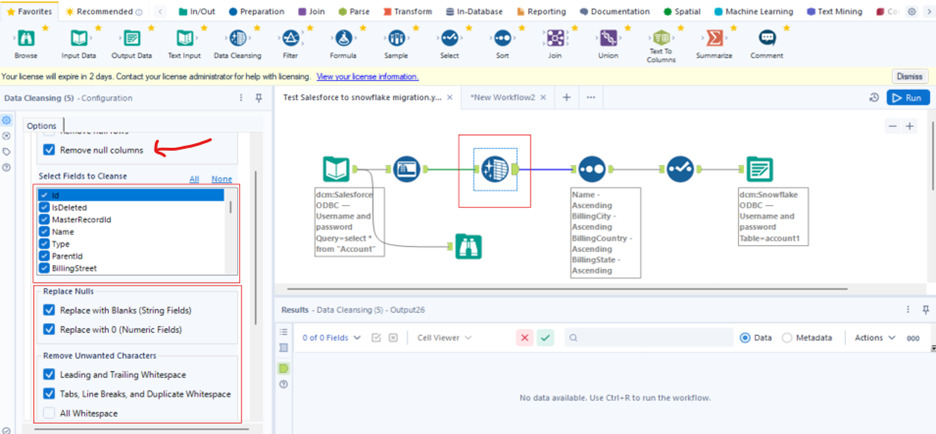
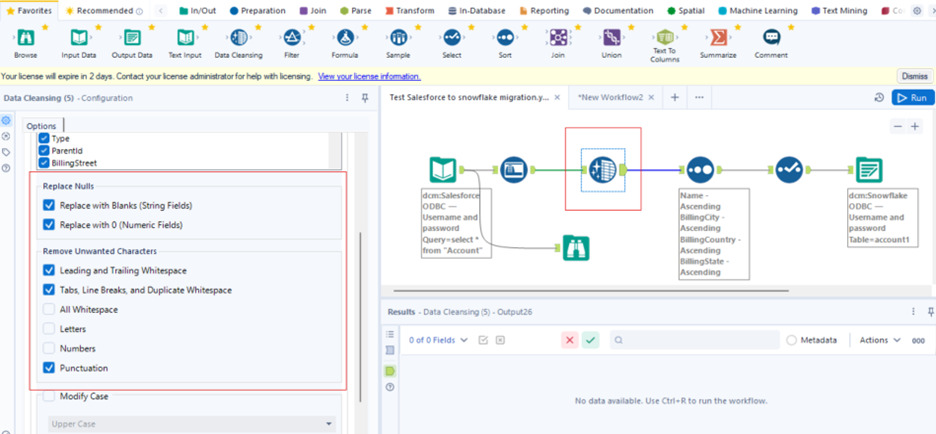
2. Data Cleaning Tool: The Data Cleansing Tool helps you clean and prepare your data by addressing common data quality issues such as removing unwanted characters, handling nulls, and standardizing cases.
>> In our Workflow, we are remove null columns, replace null values with blanks for string fields and with 0 for numeric fields, and use a data cleaning tool to remove leading and trailing whitespaces, duplicate whitespaces, and punctuation.
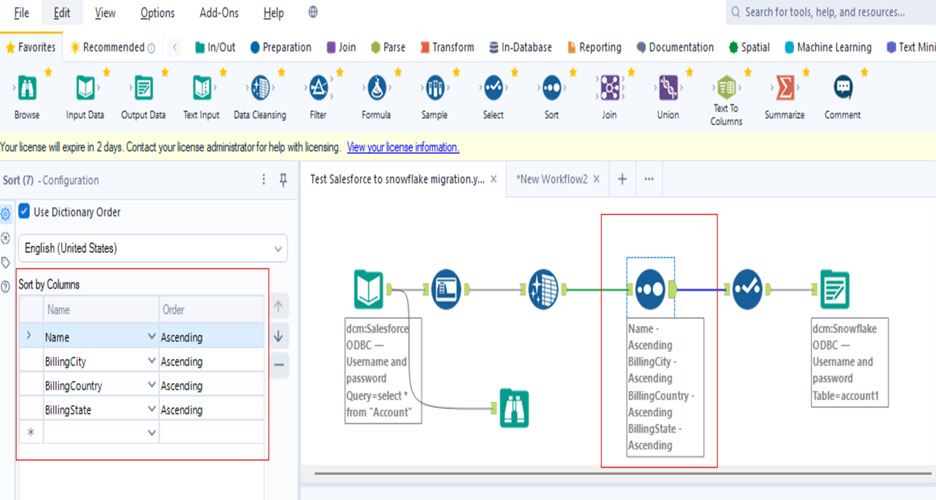
3. Sort Tool: The Sort Tool organizes your dataset based on one or more fields, essential for analysis and reporting. In our workflow, we sort columns in ascending order using the tool, as shown in the image below.
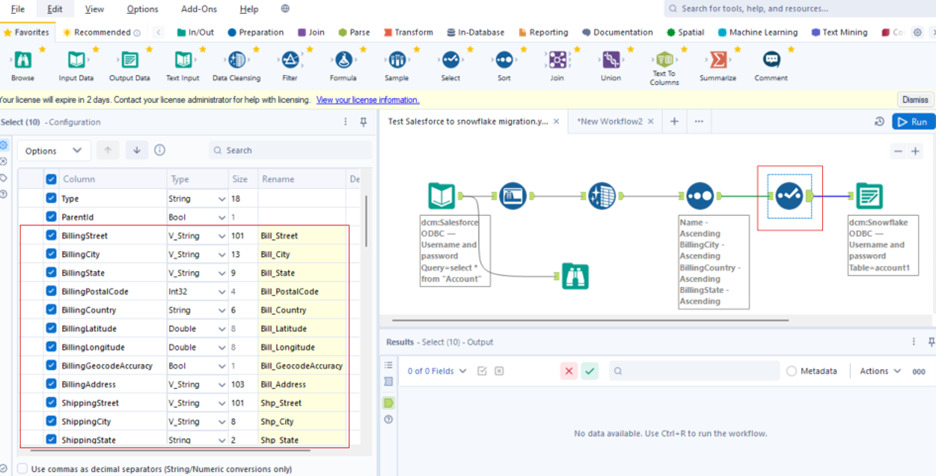
4. Select Tool: The Select Tool in Alteryx is essential for managing and configuring data fields within your workflow. It allows you to rename, reorder, and change the data type of fields, as well as select or deselect fields from your dataset.
>> Here in our workflow, we are renaming the column names using the Select Tool.
3. Connecting to Snowflake
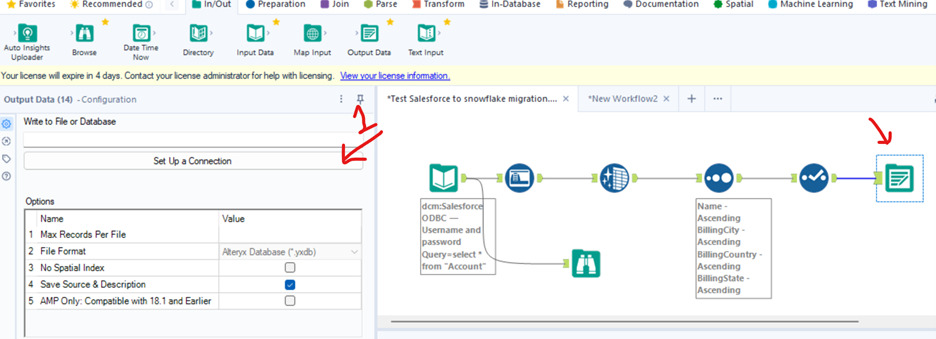
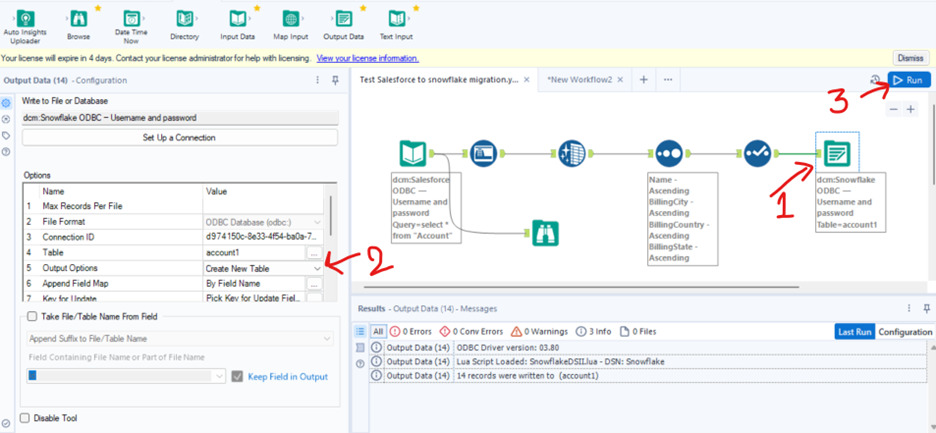
After transforming the data, load it into Snowflake. In the image below, select the Output tool and configure the settings on the left side to set up the output for the Snowflake database.
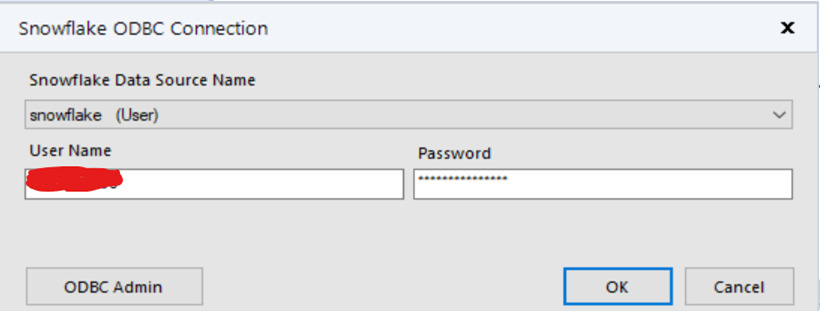
- After selecting the set-up connection, we must select the Snowflake ODBC driver from the data connection, and then a pop-up window will appear, as shown in the image below. Enter your Snowflake username and password, then click ‘OK.’
- After completion of Snowflake ODBC setup, it will ask you to give the table name which we need to create a table in Target. Give the table name and click on ‘OK’.
- After completing the setup, select the output option. Since we are creating a new table, choose the ‘Create New Table’ option for the Output tool as shown in the below image in the highlighted step-2.
- Snowflake Output Tool: Drag and drop the Snowflake Output Tool onto the canvas.
- Configure Connection: Enter your Snowflake credentials and specify the target database and table. If the table exists, ensure its structure matches the data to avoid errors. In our case, select ‘Create New Table’ when configuring the connection.
4. Data Loading
Conclusion
Migrating data from Salesforce to Snowflake with Alteryx enhances data analysis and reporting. Follow this guide to streamline data transfer and keep your Snowflake data accurate and up to date.
References:
- https://developers.snowflake.com/odbc/
- https://marketplace.visualstudio.com/items?itemName=DevartSoftware.SalesforceODBCDriver3264bit
- https://help.alteryx.com/current/en/designer/data-sources/snowflake.html#classic-mode-6690127
- https://help.alteryx.com/current/en/designer/data-sources/salesforce.html#salesforce
- https://help.alteryx.com/current/en/designer/tools.html#idp318609
Author Bio:

S.Rathnakar Reddy
Associate Software Engineer - Data Engineering-Analytics
I am working as Associate Software Engineer at Mouri Tech from the past 3.1 years. My Areas of expertise include SQL, PostgreSQL, Python and I have knowledge on AWS S3, AWS RDS, AWS Glue, AWS IAM, AWS lambda Function and Alteryx tool.